Importing and converting CSV data into a Rails model with a slick Active Admin interface
I recently exported a few data sources to CSV and thought it would interesting to migrate the data into a Ruby on Rails model and use Active Admin to create a slick admin interface. Here is the skeletal code I used.
Part 1, Rails setup
# create directory for Rails project
$ mkdir csvimport

# create new rvm gemset
$ echo "rvm use --create ruby-1.9.2@csvimport" > csvimport/.rvmrc

# enter directory
$ cd csvimport

# add rails gem
$ gem install rails

# create new Rails app
$ rails new .

# git integration
# I generally commit after every action, but I'll leave that out per sake of clutter
$ git init
$ git add .
$ git commit -am "new rails project"

# setup database
$ rake db:migrate
Part 2, Model creation
I added acts as taggable on gem, for tagging (optional). edit file: Gemfile
gem 'acts-as-taggable-on'Execute bundle to install gems
$ bundleCreate Post model
$ rails generate model Post title:string content:textAdd taggable property to Post model & make mass-assignable. file: app/models/post.rb
class Post < ActiveRecord::Base
  attr_accessible :content, :title, :tag_list
  acts_as_taggable_on :tags
end
Execute acts as taggable migration
$ rails generate acts_as_taggable_on:migrationSetup database
$ rake db:migratePart 3, Active Admin integration
Add active admin gem; edit file: Gemfile
+# active admin
+gem 'activeadmin'
+gem 'sass-rails', '~> 3.2.3'
+gem 'meta_search'
+
 # Gems used only for assets and not required
 # in production environments by default.
 group :assets do
-  gem 'sass-rails',   '~> 3.2.3'
+  #gem 'sass-rails',   '~> 3.2.3'
Execute bundle to install gems
$ bundleRun active admin generator, and setup database. Register Post model with active admin
$ rails generate active_admin:install
$ rake db:migrate
$ rails generate active_admin:resource Post
Part 4, Active Admin + acts-as-taggable-on integration
In this section I (optionally) show how you might alter the active admin post file to integrate with acts-as-taggable-on for tagging. Edit file: app/admin/post.rb:
ActiveAdmin.register Post do

  # filters
  filter :title
  filter :content
  filter :created_at
  filter :updated_at
  filter :taggings_tag_name, :as => :check_boxes, :collection => proc { Post.tag_counts.map{|t| t.name} }

  # column list
  index do
    column :id
    column :title
    column :content
    column :tag_list
    column :created_at
    column :updated_at
    default_actions
  end

  # form
  form do |f|
    f.inputs "Post" do
      f.input :title
      f.input :content
      f.input :tag_list
    end
    f.buttons
  end

end
Add root route to active admin dashboard. edit file: config/routes.rb
root :to => 'admin/dashboard#index'Remove public facing index.html file
$ rm public/index.htmlUpdate default/admin user, or create a new user via console
$ rails c
> u = AdminUser.find(1)
> u.email = 'youremailaddress'
> u.password = 'yourpassword'
> u.save
> exit
Part 5, Rake task to import CSV data
Create a rake task to import the CSV data. new file: lib/tasks/import_csv_data.rake
namespace :csvimport do
desc "Import CSV Data."
task :import_csv_data => :environment do
require 'csv'
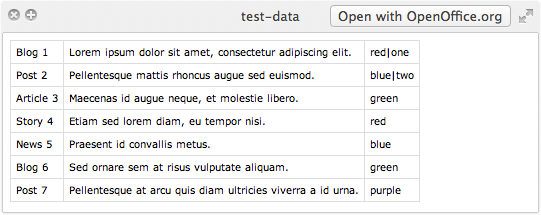
csv_file_path = '/path/to/your/file.csv'
CSV.foreach(csv_file_path) do |row|
p = Post.create!({
:title => row[0],
:content => row[1],
:tag_list => row[2].split('|'),
}
)
end
end
endExecute the rake task to import the CSV data into the Rails model
rake csvimport:import_csv_dataStart the WEBrick server (development mode)
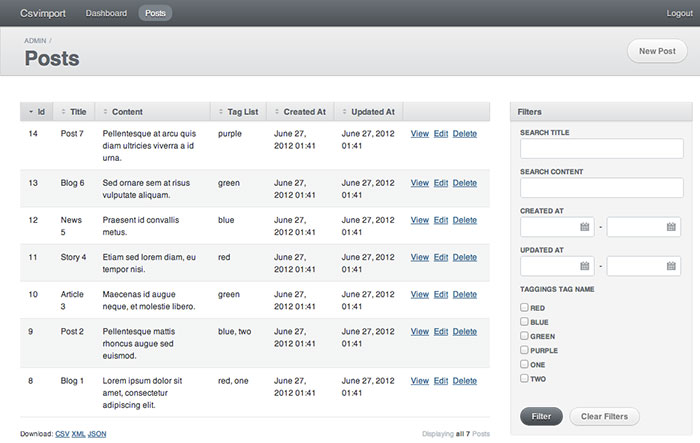
rails sHere is a screenshot of the CSV data file I imported, and below, the active admin interface that was created: