Sending messages between a Swift webview and a Rails backend using Javascript
In this tutorial, I’ll share some code I’ve been working on to better understand how a Swift webview can send and receive messages via javascript. For the backend I decided to create a simple Rails server with a single controller and Ratchet for the CSS layout.
Part 1: the Rails backend
# create directory and add RVM files
mkdir swift_webview
echo ruby-2.2.3 > swift_webview/.ruby-version
echo swift_webview > swift_webview/.ruby-gemset
cd swift_webview

# add rails gem and create new project
gem install rails
rails new --skip-spring --database=postgresql --skip-test-unit .

# setup database
rake db:create && db:migrate
Adding Ruby gems, edit file: Gemfile; and then execute: bundle install
# commented out turbolinks to reduce issues with Ratchet
#gem 'turbolinks'

# added some common dev/test gems:
group :development, :test do
  # Call 'byebug' anywhere in the code to stop execution and get a debugger console
  # gem 'byebug'

  gem 'better_errors'
  gem 'binding_of_caller'
  gem 'bullet'
  gem 'meta_request'
  gem 'pry-awesome_print'
  gem 'pry-rails'
  gem 'quiet_assets'
  gem 'rspec-rails'
  gem 'rubocop', require: false
end

# added:
gem 'devise'
gem 'puma'
gem 'ratchet-sass'
Setup devise for user authentication.
rails generate devise:install
rails generate devise User
rake db:migrate
Per javascript assets, edit file: app/assets/javascripts/application.js
// removed:
//= require turbolinks

// added:
//= require ratchet
Per Sass, renamed: app/assets/stylesheets/application.css to app/assets/stylesheets/application.scss; and edited:
/*
 *= require ratchet
 *= require_tree .
 *= require_self
 */
Added asset path config to file: config/application.rb
module SwiftWebview
  class Application < Rails::Application

    # ...snip...

    # added the following:

    # Add the fonts path
    config.assets.paths << Rails.root.join('app', 'assets', 'fonts')

    # Precompile additional assets
    config.assets.precompile += %w( *.svg *.eot *.woff *.ttf )
  end
end
Revised default application layout file per Ratchet, edit file: app/views/layouts/application.html.erb
<!DOCTYPE html>
<html lang="en">
  <head>
    <meta charset="utf-8">

    <!-- Sets initial viewport load and disables zooming  -->
    <meta name="viewport" content="initial-scale=1, maximum-scale=1">

    <!-- Makes your prototype chrome-less once bookmarked to your phone's home screen -->
    <meta name="apple-mobile-web-app-capable" content="yes">
    <meta name="apple-mobile-web-app-status-bar-style" content="black">

    <title>Rails Swift Webview</title>

    <%= stylesheet_link_tag 'application', media: 'all' %>
    <%= csrf_meta_tags %>
  </head>
  <body>

    <!-- Make sure all your bars are the first things in your <body> -->
    <header class="bar bar-nav">
      <h1 class="title">Rails Swift Webview</h1>
    </header>

    <!-- Wrap all non-bar HTML in the .content div (this is actually what scrolls) -->
    <div class="content">
      <%= yield %>
    </div>

    <%= javascript_include_tag 'application' %>
  </body>
</html>
Edited rails routes for webview controller, edit file: config/routes.rb
Rails.application.routes.draw do
  devise_for :users
  root 'webview#index'
end
Created the webview controller, new file: app/controllers/webview_controller.rb
class WebviewController < ApplicationController
  def index
    # the webview will pass the device uuid to this controller
    uuid = params[:uuid] || SecureRandom.uuid
    email = "#{uuid}@example.com".downcase

    # look up user, and create as necessary
    @user = User.where(email: email).first
    if @user.blank?
      password = SecureRandom.hex
      @user = User.create({
        email: email,
        password: password,
        password_confirmation: password,
      })
    end

    sign_in @user
  end
end
Created the webview controller view/template file: new file: app/views/webview/index.html.erb
<div class="content-padded">
<div class="card">
<ul class="table-view">
<li class="table-view-cell">
Email:<br/>
<%= @user.email %>
</li>
<li class="table-view-cell">
Sign in count: <span class="badge"><%= @user.sign_in_count %></span>
</li>
</ul>
</div>
<div class="content-padded">
<button class="btn btn-primary btn-block" data-btn-click="primary">Primary</button>
<button class="btn btn-positive btn-block" data-btn-click="positive">Positive</button>
<button class="btn btn-negative btn-block" data-btn-click="negative">Negative</button>
</div>
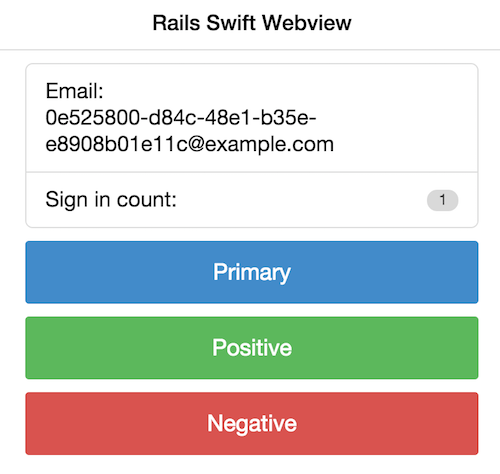
</div>At this point, if you start rails and browse to http://localhost:3000, you should see something like:
I then added a new javascript file to handle sending messages to Swift. new file: app/assets/javascripts/webview.js
(function($){
  $(document).ready(function(){

    "use strict";

    window.webviewer = new function() {

      // method to send message to Swift webkit
      this.send_webkit_message = function(message) {
        try {
          webkit.messageHandlers.javascriptHandler.postMessage(message);
        } catch(err) {
          console.log('error', err);
        }
      }

      // button click event
      this.init_btn_click = function(){
        var _this = this;
        $('[data-btn-click]').click(function(){
          var btn_val = $(this).data('btn-click');
          console.log('button click', btn_val);
          _this.send_webkit_message("Button click: " + btn_val);
        });
      }

      // send message when javascript is done loading
      this.done_loading = function(){
        console.log('done loading');
        this.send_webkit_message("Javascript finished loading");
      }

      // method to return pong response, to test message sent from native Swift code
      this.ping = function(){
        console.log('ping');

        this.send_webkit_message("pong");
        return true;
      }

      this.init = function(){
        console.log('webviewer init');

        this.init_btn_click();
        this.done_loading();
      }

    };

    // note: the document ready calls will be sent from Swift native code
    // var ready = function(){
    //   window.webviewer.init();
    // }
    //$(document).ready(ready);
    //$(document).on('page:load', ready);

  });
})(jQuery);For the development of this tutorial, I used ngrok to create a secure SSL tunnel to my localhost.
# install via brew as necessary
brew install ngrok

# start rails (puma)
rails s -b 0.0.0.0

# start ngrok
ngrok 3000
Part 2: the Swift webview
Open XCode, File > New > Project… and choose iOS Application, Single View Application
I entered:
Product Name: Swift Webview
Organization Name: Eric London
Organization Identififer: com.ericlondon
Language: Swift
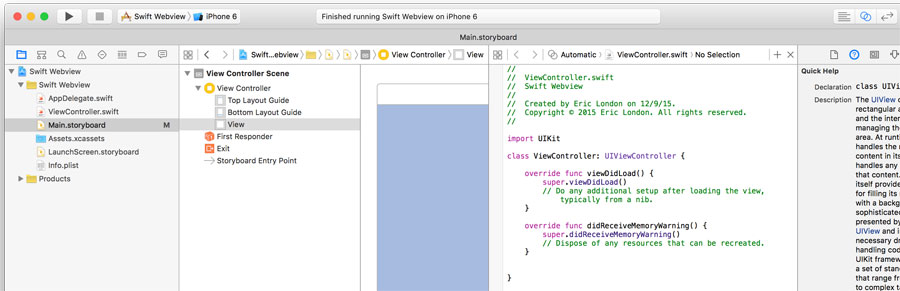
Devices: UniversalIn the project navigator, click on the Main.storyboard file. In the View controller scene, click on the View. Then, in the top menu bar, click on the button to show the Assistant editor.
To create an outlet, hold down the control button, click and drag from the view to the ViewController source code, and release inside the class declaration.
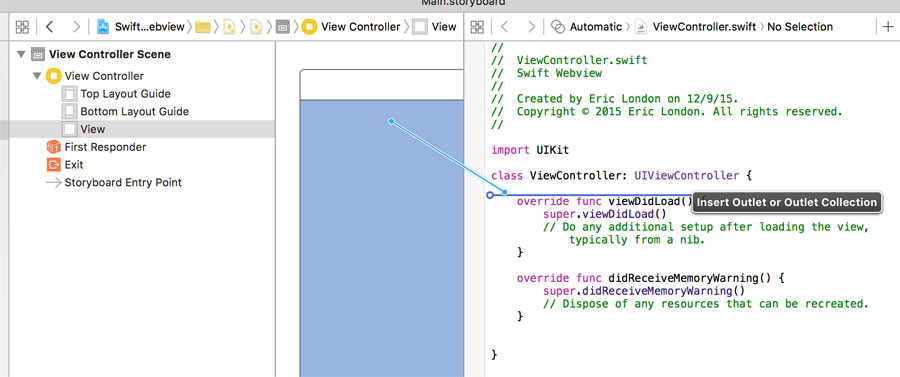
Enter the following options and click the connect button:
Connection: Outlet
Object: View Controller
Name: containerView
Type: UIView
Storage: Strong
Now it’s time to add the rest of the code to the ViewController.swift file
import UIKit
// add WebKit include:
import WebKit

class ViewController: UIViewController, WKScriptMessageHandler, WKNavigationDelegate {
    @IBOutlet var containerView: UIView!
    var webView: WKWebView?

    override func loadView() {
        super.loadView()

        // the following code is used to execute custom javascript
        // in the webview to initialize the webviewer object
        let contentController = WKUserContentController()
        let userScript = WKUserScript(
            source: "window.webviewer.init()",
            injectionTime: WKUserScriptInjectionTime.AtDocumentEnd,
            forMainFrameOnly: true
        )
        contentController.addUserScript(userScript)

        // this code to used to allow the webview to send messages to swift
        // via: webkit.messageHandlers.javascriptHandler.postMessage(message);
        contentController.addScriptMessageHandler(
            self,
            name: "javascriptHandler"
        )

        let config = WKWebViewConfiguration()
        config.userContentController = contentController

        // create the webview with the above configuration options
        self.webView = WKWebView(frame: self.containerView.frame, configuration: config)
        self.view = self.webView
    }

    override func viewDidLoad() {
        super.viewDidLoad()

        // get the device uuid, it will be passed to the webview:
        let device_uuid = UIDevice.currentDevice().identifierForVendor!.UUIDString

        // define the api path, and load the request in the webview:
        let api_host = "https://your-ngrok-hostname.ngrok.com?uuid=" + device_uuid
        let url = NSURL(string: api_host)
        let req = NSURLRequest(URL: url!)
        self.webView!.loadRequest(req)

        // the following is used to implement didFinishNavigation
        self.webView!.navigationDelegate = self

    }

    func webView(webView: WKWebView,
        didFinishNavigation navigation: WKNavigation!){
            NSLog("webview finished loading")

            // when the webview has finished loading, send it a message via javascript
            self.webView!.evaluateJavaScript("window.webviewer.ping()", completionHandler:  nil)

      }

    func userContentController(userContentController: WKUserContentController,
        didReceiveScriptMessage message: WKScriptMessage) {
            // NSLog(message.name)
            NSLog(message.body as! String)
    }

    override func didReceiveMemoryWarning() {
        super.didReceiveMemoryWarning()
        // Dispose of any resources that can be recreated.
    }

}
Build and run the project in Xcode using the iPhone iOS simulator.
Click on the three buttons in the webview, the Debug console should show something like:
2015-12-09 13:26:40.187 Swift Webview[43868:5506927] Javascript finished loading
2015-12-09 13:26:40.187 Swift Webview[43868:5506927] webview finished loading
2015-12-09 13:26:40.196 Swift Webview[43868:5506927] pong
2015-12-09 13:26:41.943 Swift Webview[43868:5506927] Button click: primary
2015-12-09 13:26:42.409 Swift Webview[43868:5506927] Button click: positive
2015-12-09 13:26:43.640 Swift Webview[43868:5506927] Button click: negative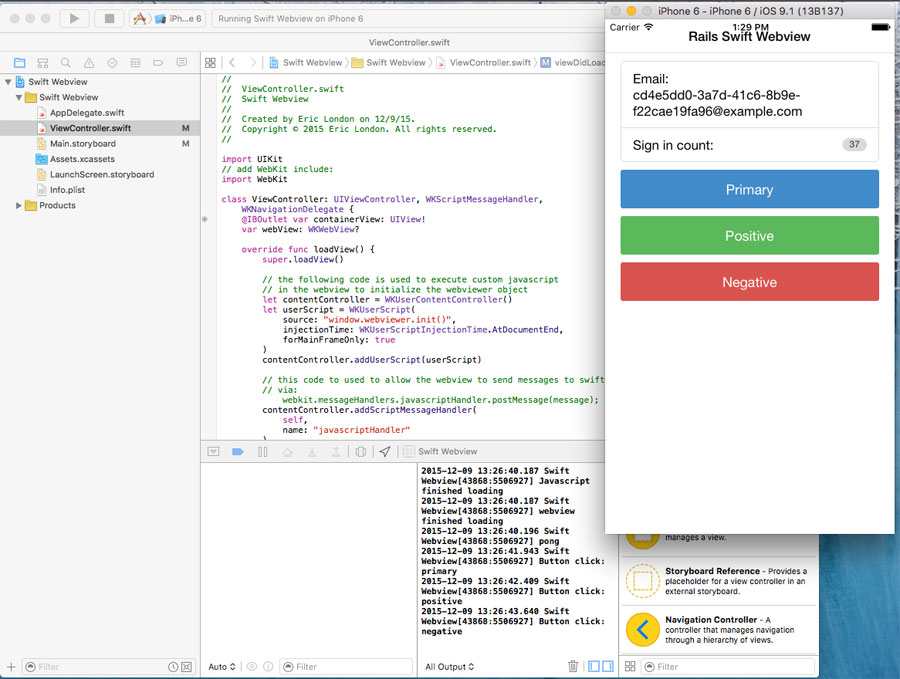
Here are some more Swift webview tutorials for further reading: