Creating a web server to host Ruby on Rails and PHP using Phusion Passenger, Nginx, and Apache
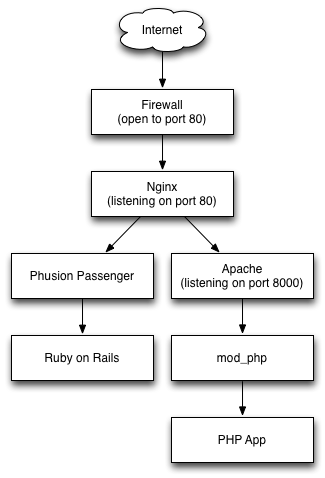
In this article I’ll explain how I recently setup a web server to host both 1. Ruby on Rails via Phusion Passenger (mod_rails), and 2. PHP via Apache (mod_php). Nginx will sit in front and proxy requests (by hostname) to Apache, or serve them directly via Phusion. Here’s a rough diagram:
I started with a fresh (minimal) installation of Ubuntu 10.04 LTS. Here we go:
# update installed packages
$ sudo apt-get update
$ sudo apt-get upgrade

# install SSH server
$ sudo apt-get install openssh-server -y
Part 1, Apache/PHP
Install PHP & Apache
sudo apt-get install php5 php5-cli php5-common php5-curl php5-gd php5-mysql php-pear -ySet Apache to listen on port 8000. Note: nginx will listen on 80 and proxy requests to Apache.
# edit file: /etc/apache2/ports.conf

# replace:
NameVirtualHost *:80
Listen 80

# with:
NameVirtualHost *:8000
Listen 8000
For sake of this tutorial, I created a simple PHP script.
$ mkdir /var/www/php.eric.vm
$ echo '<?php echo "hello php world"; ?>' >> /var/www/php.eric.vm/index.php
And created an Apache vhost for the above script. New/example file: /etc/apache2/sites-available/php.eric.vm
<VirtualHost *:8000>

  ServerName php.eric.vm
  ServerAdmin webmaster@localhost
  DocumentRoot /var/www/php.eric.vm

  <Directory /var/www/php.eric.vm >
    AllowOverride All
  </Directory>

  ErrorLog /var/log/apache2/php.eric.vm-error.log

  LogLevel warn

  CustomLog /var/log/apache2/php.eric.vm-access.log combined

</VirtualHost>
Enabled the new conf file by adding a symlink:
$ cd /etc/apache2/sites-enabled
$ sudo ln -s ../sites-available/php.eric.vm

# removed the existing default vhost:
$ sudo rm 000-default

# restarted Apache
$ sudo service apache2 restart
At this point I was able to reach my php script by browsing to http://php.eric.vm:8000
Part 2, RVM/Ruby/Passenger
Here all the steps I executed on the shell
# Install CURL, to start the RVM installation
sudo apt-get install curl -y

# Install RVM (multi-user installation)
$ sudo bash -s stable < <(curl -s https://raw.github.com/wayneeseguin/rvm/master/binscripts/rvm-installer )

# add user to RVM group
$ sudo usermod -a -G rvm eric

# Install Ruby/RVM dependencies
# NOTE: you can run "rvm requirements" to get this list:
$ sudo apt-get install build-essential openssl libreadline6 libreadline6-dev curl git-core zlib1g zlib1g-dev libssl-dev libyaml-dev libsqlite3-0 libsqlite3-dev sqlite3 libxml2-dev libxslt-dev autoconf libc6-dev ncurses-dev automake libtool bison subversion -y

# install nodejs, per javascript runtime
$ sudo apt-get install python-software-properties
$ sudo add-apt-repository ppa:chris-lea/node.js
$ sudo apt-get update
$ sudo apt-get install nodejs

# install ruby 1.9.2
$ rvmsudo rvm install 1.9.2

# set default version of ruby
$ rvm use 1.9.2 --default

# install rails
$ rvmsudo gem install rails --version 3.2.1

# install mysql server
# note: rails defaults to sqlite3, choose whatever you want
$ sudo apt-get install mysql-server -y

# install passenger
$ rvmsudo gem install passenger

# install nginx/passenger requirements
$ sudo apt-get install libcurl4-openssl-dev -y

# install passenger nginx module
$ rvmsudo passenger-install-nginx-module
# Install options I chose:
# 1. Yes: download, compile and install Nginx for me. (recommended)
# Please specify a prefix directory [/opt/nginx]:
Part 3, Test Rails App
For this tutorial I created a (very) simple Rails app.
# create new rails app
$ cd /var/www
$ rails new railsdemo
$ cd railsdemo

# integrate with git version control
$ git init
$ git add .
$ git commit -am "initial rails repo"

# remove default placeholder index page
$ rm public/index.html

# create sample home controller
$ rails generate controller home index

# add route in file: config/routes.rb
root :to => "home#index"

# version control
$ git add .
$ git commit -am "added home controller and route"
(as usual) if I had made changes to my models, I would have run:
$ rake db:migrateTo test my rails development environment:
$ rails sAt this point, I was able to browse to my rails app at: http://rails.eric.vm:3000
The generic controller message was shown:
Home#index
Find me in app/views/home/index.html.erb
To run the rails app in production mode, I edited the file: config/environments/production.rb, and made this change:
config.assets.compile = trueAnd as necessary, migrate production database:
$ RAILS_ENV=production rake db:migrateAt this point the rails app should be able to run in production mode using:
$ rails s -e production(if not, check log/production.log for errors)
Part 4, Nginx
Although nginx is now installed, you’ll need a init script. I simply copied the one listed here: http://techoctave.com/c7/posts/16-how-to-host-a-rails-app-with-phusion-passenger-for-nginx, and pasted it here: /etc/init.d/nginx
# set file permissions
$ sudo chmod +x /etc/init.d/nginx

# add init script run levels
$ sudo /usr/sbin/update-rc.d -f nginx defaults
The last part of this tutorial involves making changes to the nginx conf file: /opt/nginx/conf/nginx.conf
For my server I set nginx to run as the same user/group as Apache, and increased the number of worker processes (per # of CPU):
# replaced:
user  nobody;
worker_processes  1;

# with:
user   www-data www-data;
worker_processes  4;
Within the http directive, I added a server directive for my rails app:
http {
  # ...snip...
  server {
    listen 80;
    server_name rails.eric.vm
    root /var/www/railsdemo/public
    passenger_enabled on;
  }
  # ...snip...
}
And an upstream and server directive for Apache:
http {
  # ...snip...
  upstream apache {
    server 127.0.0.1:8000 weight=5;
  }

  server {
    listen 80;
    server_name php.eric.vm;

    location / {
      proxy_pass http://apache;
    }
  }
  # ...snip...
}
The above configuration changes allow nginx to listen on port 80, and based on hostname: 1. server the rails app (nginx > passenger > rails); or 2. proxy pass the request to Apache (nginx > apache > php).